They should've been finished a while ago, but as usual life kind of intervenes. Both in the lure of the woods, and also the fact that the candles and lanterns have been selling well, so then I have to. . . make more of them. Which is hardly a hardship, except I tend to get focused on one thing (resin cubes) and then feel slightly resentful when something else (lanterns and candles) needs some attention. Especially since I figured out how to make the lanterns and candles years ago - I'm the kind of personality that likes new, shiny things. Lanterns?? That's so last year! Unless you're trying to sustain a business, in which case that's so "get yourself up to the studio and make a batch right now."
But - it finally fell into place, and in conjunction with a never-ending World Series game I had plenty of time to play with my new toy. So - here are a few pictures of the new resin blocks. It's kind of hard to get a good feel for how they're going to look once they're totally finished and actually on a person, but here's a teaser anyway. And at some point (soon???) I'll have them photographed for real and an actual finished product.
If you're wondering what the strange blue background is - it's a silicone mat. Word to the wise - if you like playing with resin (and really, who doesn't?), silicone is your friend. Because resin, even when it's not-quite-cured won't stick to it. And why would I be fooling with resin before it's all the way cured? Because it's a LOT easier to screw in little, tiny screw eyes when the resin's still a little soft. There - for all of you out there occupying yourself with resin hobbies, there's my tip of the day. Oh - and one more - just be careful you don't put your fingerprints in it.
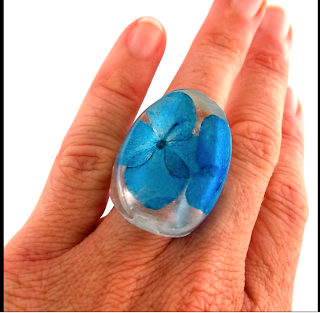
Along with the resin blocks, I also finally got my molds for a larger (size 9) ring. I've been waiting for this mold for ever. Seriously, it took it something like 7 weeks to get here from an Etsy supplies seller in Canada. I'm pretty sure she used the mule train method of package transport. Or that someone in customs wanted several size 9 resin rings and just borrowed the mold for a few weeks.
I'm pretty taken with the shape - it's a lovely rounded dome, and these guys should be up on my Etsy site in the very near future. And why don't you see it on my hands? Because, as my mother informed me, I have old lady hands that aren't really appropriate for photography.
I'll admit I was a little taken aback with that pronouncement, but upon closer examination I had to concede that she's correct. Which is a problem because in the Etsy listings it's nice to see a ring on someone's hand so you can see the proportions. And the only other hands in this house belong to a 9 year old boy and a 40 year old man - not much better (worse?!) for showing off a ring. So I hadn't quite figured out what to do about this problem, until I stumbled upon a brilliant feature in iPhoto - edge blur!
It turns out, if I blur the edges - a lot, like as much as it will let me - I can induce a nice soft focus effect that somewhat hides the true state of my hands. Not that I mind my hands - they're sort of proof that I've actually *done* stuff. I'm always slightly suspicious of people who look untouched after the very first blush of youth should have worn off. I wonder what exactly they've been doing with themselves, and I suspect the answer is not much.
But - that still doesn't mean these hands make anyone want to buy jewelry. They probably make people want to buy alpha hydroxy products. Thus - soft focus! It allows me to go from this:
To this:
I think that's an improvement. Or at least a good disguise. And in the meantime I'm still on the lookout for some fresh-handed teenager that would like to moonlight as an amateur hand model. Except that sounds kind of weird, and also where am I going to find one of those every time I want to photograph a ring? So for the time being it looks like I'm sticking with edge blur.


your rings are soooo pretty..
ReplyDeleteare you using ice resin?